こんにちは。
今回は、pythonでopencvを使って、画像を回転させる方法について、書きたいと思います。
それでは書いていきます。
90度回転させる
ここでは、画像を90度回転させます。
opencvでは、cv2.rotate()で回転させることができます。
コードを書くと、以下のような感じです。
import cv2
import matplotlib.pyplot as plt

# 画像の読み込み
img = cv2.imread("test.jpg")
# BGRからRGBへの変換
img = cv2.cvtColor(img, cv2.COLOR_BGR2RGB)
# 右に90度回転させる
img_r90 = cv2.rotate(img, cv2.ROTATE_90_CLOCKWISE)
# 左に90度回転させる
img_l90 = cv2.rotate(img, cv2.ROTATE_90_COUNTERCLOCKWISE)
# matplotlibを使って、表示
fig,ax = plt.subplots(1,3)
ax[0].imshow(img)
ax[0].set_title("original")
ax[0].axis("off")
ax[1].imshow(img_r90)
ax[1].set_title("rotate r90")
ax[1].axis("off")
ax[2].imshow(img_l90)
ax[2].set_title("rotate l90")
ax[2].axis("off")
plt.show()
実行すると、以下のようになります。

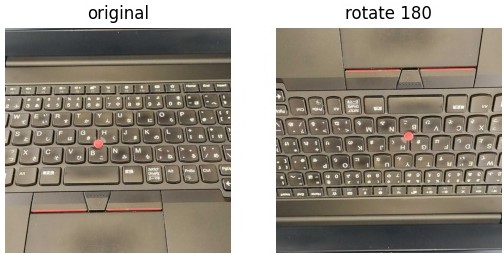
180度回転させる
ここでは、画像を180度回転させます。
こちらでも、cv2.rotate()を使って回転させます。
先ほどとの違いは、第2引数に渡す値になります。
コードだと以下のようになります。
import cv2
import matplotlib.pyplot as plt

# 画像の読み込み
img = cv2.imread("test.jpg")
# BGRからRGBへの変換
img = cv2.cvtColor(img, cv2.COLOR_BGR2RGB)
# 180度回転させる
img_180 = cv2.rotate(img, cv2.ROTATE_180)
# matplotlibを使って、表示
fig,ax = plt.subplots(1,2)
ax[0].imshow(img)
ax[0].set_title("original")
ax[0].axis("off")
ax[1].imshow(img_180)
ax[1].set_title("rotate 180")
ax[1].axis("off")
plt.show()
実行すると、以下のようになります。

任意の角度に回転させる
ここでは、画像を任意の角度に回転させます。
こちらは、少し難しくなって、以下の2つのメソッドを使います。
- cv2.getRotationMatrix2D()
- cv2.warpAffine()
コードを書くと、以下のようになります。
import cv2
import matplotlib.pyplot as plt

# 画像の読み込み
img = cv2.imread("test.jpg")
# BGRからRGBへの変換
img = cv2.cvtColor(img, cv2.COLOR_BGR2RGB)
# 任意の角度に回転させる
angle = 30
h,w = img.shape[:2]
center = (int(w/2), int(h/2))
trans = cv2.getRotationMatrix2D(center, angle, 1.0)
img_rotate = cv2.warpAffine(img, trans, (w,h))
# 左に90度回転させる
img_l90 = cv2.rotate(img, cv2.ROTATE_90_COUNTERCLOCKWISE)
# matplotlibを使って、表示
fig,ax = plt.subplots(1,2)
ax[0].imshow(img)
ax[0].set_title("original")
ax[0].axis("off")
ax[1].imshow(img_rotate)
ax[1].set_title("rotate image")
ax[1].axis("off")
plt.show()
実行すると、以下のようになります。

今回はこれで、終わります。